Adjusting Feed Gate Height
Height Check
- Test to see if the gate opening is wide enough by sliding the edge of a card through the opening, side to side. The card should be able to reach the interior rollers without resistance (i.e. not touching the gate). Make sure there are no pinch points on either corner.
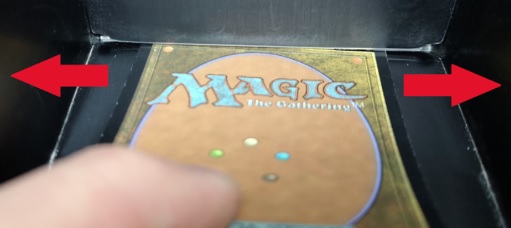
- If the gate is high enough to accommodate one card, see if it is possible to pass a second card through at the same time. Only one card should fit.
- Check that the gate opening is square with the base plate.
If any of the above steps fail, proceed to gate adjustment. Otherwise your gate is at the correct height.
If a single card cannot pass through or has friction with the gate, the gate must be adjusted up. If two cards can pass through or may become wedged the gate must be adjusted down.
Tools Needed
- 5mm or 3/16" Allen key (provided)
- 2mm or 1/16" Allen key (provided)
- orange nut adjustment tool (provided)
or - 13mm or 1/2" wrench
Adjustment Procedure
- Remove the extended feed hopper using the thumb screws on each side.
- Remove the four 2mm screws and remove the top cover plate to expose the gate adjustment bushings.

- There should be 2 orange nut adjustment tools already on the nuts. If you prefer you may use a wrench. The nut and bushing work together to raise and lower the gate.
- The bushing adjusts the lowest possible height of the gate. The nut holds the gate to that height and prevents it from rising.

It is best practice to adjust in small increments. One full rotation will raise or lower the gate by 1mm. Since cards are 0.3mm thick, it is best to make adjustments of 1/8 of a turn or less.
Moving the Gate Up
- Turn the nut counter-clockwise while holding the bushing steady with the Allan key.
- Turn the bushing counter-clockwise while holding the nut steady with the adjustment tool or wrench until the block is once again snug with the nut (i.e. it won't go higher).
Moving the Gate Down
- Turn the bushing clockwise while holding the nut steady with the adjustment tool or wrench.
- Turn the nut clockwise while holding the bushing steady with the Allan key until it is lowered all the way to the block and is snug.
- Turn the bushing counter-clockwise slightly while holding the nut steady with the adjustment tool or wrench ensure the nut is locked. Do not overtighten.
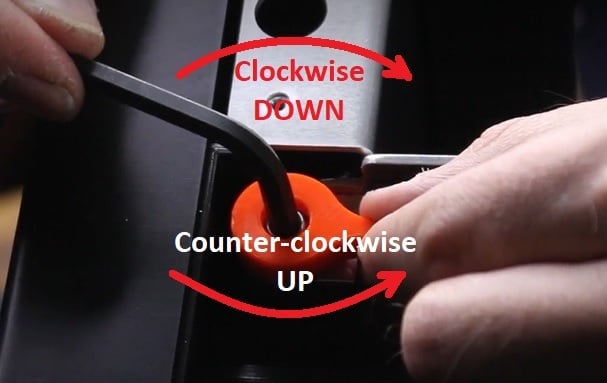
Only the bushing or nut should be moving with each adjustment step, not both. Make sure to hold whichever you are not adjusting steady, as they can rotate together.
It is much easier and more effective to move the gate upwards rather than downwards. For best results; adjust the gate fully downwards until it is resting on a card and you can feel resistance when moving the card. Adjust upwards in small increments until there is no longer resistance on the card and the Height Check passes.
- Make sure the height of both sides of the gate are even after adjustments. The gate should be square with the bottom plate.
- After adjustments, repeat the Height Check above. Repeat these steps until the gate is at the correct height.
- It is recommended to run a test sort of 100-200 low value cards with the card weight before replacing the cover to test the adjustments.
If the test sort throws the refill-hopper error when on low card numbers (<200) then the gate likely needs to be raised very slightly. Cleaning the feed wheels will also assist.