Adjusting Feed Gate Height
Height Check
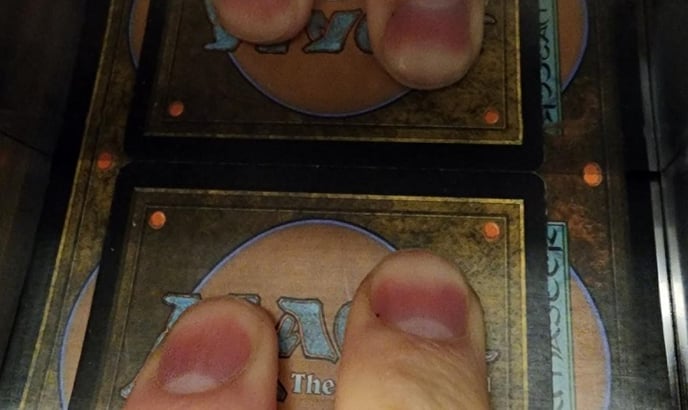
- Test to see if the gate opening is high enough by inserting a card lengthwise into the slot. It should fit under the gate without resistance and can reach the rubber rollers on the inside. For best results while testing, the bottom card should be a foil.

- If the gate is high enough to accommodate one card, see if it is possible to pass a second card through at the same time. Try to insert the card lengthwise to check that both sides are square. Only one card should fit. Press down on the second card firmly and try to push it under the gate. If the gate height is correct, you should not be able to. This second card will likely be damaged, so don't use anything expensive!
- Check that the gate opening is square with the base plate.
If any of the above steps fail, proceed to gate adjustment. Otherwise, your gate is at the correct height.
If a single card cannot pass through or has friction with the gate, the gate must be adjusted up. If two cards can pass through or may become wedged the gate must be adjusted down.
Tools Needed
- 2.5mm or 7/64" Allen key (provided) - For the adjustment screws
- 2mm or 3/32" Allen key (provided) - For the cover plate
Adjustment Procedure
- Remove the extended feed hopper using the thumb screws on each side.
- Remove the four 2mm screws and remove the top cover plate to expose the gate beams and adjustment screws.

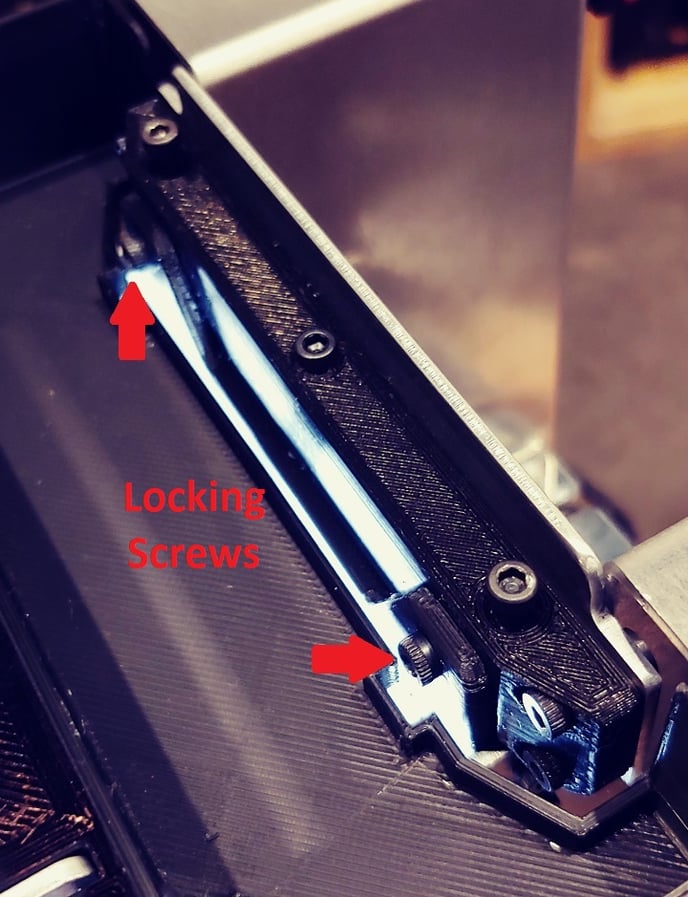
- Loosen the 2 locking screws by turning them counter-clockwise. They do not need to be removed.
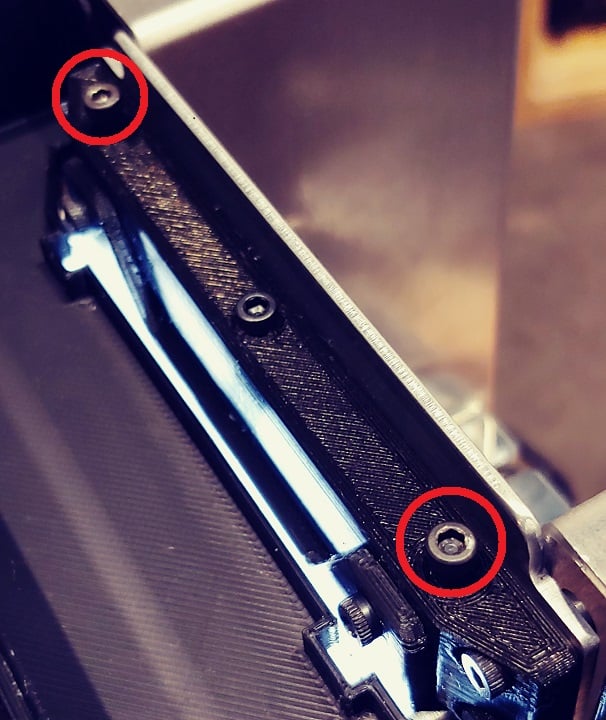
- Loosen all 3 top screws (counterclockwise) to the top of the gate edge, but do not remove them.
- Pull upwards on the gate/top beam, as the gate will not move upwards on its own without the side screws being in contact with the bottom beam (which we don't want at this stage!)

With Shims
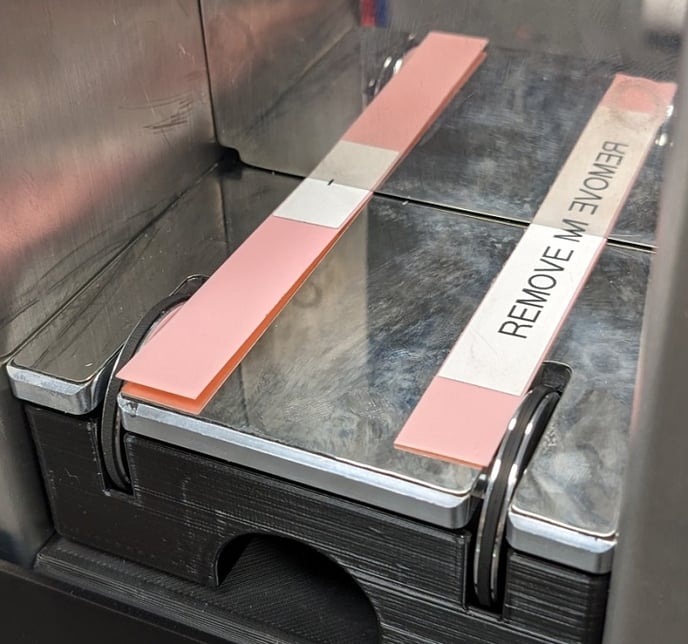
- Place the gate shims under the gate. One next to each feed wheel, on the inside.
- Screw the center screw down (clockwise). This should lower the gate. Keep going until the gate shims cannot be pulled out, then 1/8th of a turn more.
- Screw the two side screws in (clockwise) until they touch the lower beam (i.e. you feel some resistance). Alternate sides by turning one side a full turn once, then the other. Once you feel both screws contact the beam below, move on to the next step. The gate shims should still not be able to be taken out.
- Move the gate upwards slowly, by turning the side screws clockwise about 1/8 of a turn or less (45 degrees) alternating each side until you can pull out the shims. There should still be some friction, but the shims should be able to be pulled out with little effort. Remove the shims.
- Tighten the locking screws (the horizontal screws, clockwise) again. Turn until they are finger-tight, then 1/4 of a turn more.
- Repeat the Height Check above. One card should be able to go under the gate easily. Two cards, even with force applied should not fit under the gate.
- If one card cannot fit, the gate is too low. Continue turning the side screws clockwise in small amounts (1/16th of a turn) until the single card fits without resistance from the metal gate.
- If two cards can fit, the gate is too high. Adjust the side screws counterclockwise in small amounts (1/16th of a turn) until two cards cannot fit even with force applied. You may need to press down on the gate after loosening the screws.
- When satisfied with the gate height, tighten the locking screws (if not already done) and run a test sort of ~200 or more cards, with the card weight.
- If no cards enter the scanner, the gate may be either too low (no cards get through) or too high (2 cards pinch or jam). Loosen the locking screws and go back to Step 8.
- If multiple cards enter the scanner, the gate is too high. Loosen the locking screws, go back to Step 8, and slightly lower the gate.
The ideal height of the gate slot is 0.45mm since cards are 0.3mm high. One full turn of a gate screw will move the gate 1.5mm, so it is best to adjust and test in very small increments (1/16th of a turn or less) once you're near the target height.
Cleaning the feed wheels with isopropyl alcohol will also assist if they need extra grip.
Without Shims
- Place one card under the gate. Screw the center screw down (clockwise). This should lower the gate. Keep going until you start to feel resistance when pulling the card out.
- Screw the two side screws in (clockwise) until they touch the lower beam (i.e. you feel some resistance). Alternate sides by turning one side a full turn once, then the other. Once you feel both screws contact the beam below, move on to the next step.
- Move the gate upwards slowly, by turning the side screws clockwise about 1/8 of a turn or less (45 degrees) each until you can pull out the card under the gate easily.
- Tighten the locking screws (the horizontal screws, clockwise) again. Turn until they are finger-tight, then 1/4 of a turn more.
- Repeat the Height Check above. One card should be able to go under the gate easily. Two cards, even with force applied should not fit under the gate.
- If one card cannot fit, the gate is too low. Continue turning the side screws clockwise in small amounts (1/16th of a turn) until the single card fits without resistance from the metal gate.
- If two cards can fit, the gate is too high. Adjust the side screws counterclockwise in small amounts (1/16th of a turn) until two cards cannot fit even with force applied. You may need to press down on the gate after loosening the screws.
- When satisfied with the gate height, tighten the locking screws (if not already done) and run a test sort of ~200 or more cards, with the card weight.
- If no cards enter the scanner, the gate may be either too low (no cards get through) or too high (2 cards pinch or jam). Loosen the locking screws and go back to Step 8.
- If multiple cards enter the scanner, the gate is too high. Loosen the locking screws, go back to Step 8, and slightly lower the gate.
The ideal height of the gate slot is 0.45mm since cards are 0.3mm high. One full turn of a gate screw will move the gate 1.5mm, so it is best to adjust and test in very small increments (1/16th of a turn or less) once you're near the target height.
Cleaning the feed wheels with isopropyl alcohol will also assist if they need extra grip.